Workflow
Let us walk through a simple (but complete) example to demonstrate how our code crafting tools can be leveraged in bottom-up and top-down software development workflows.
Bottom-Up
In a bottom-up workflow, the most fundamental, low-level pieces of software are implemented first, and then functionality is progressively added by assembling these pieces into more complex, higher-level components.
Define Message Data Structures
The first step in a bottom-up workflow is to define the data content and format of each message that is passed between software components in the application. This is accomplished by writing suitable data structure declarations in Tydl, our custom type definition language.
import all: from: (Tydl, Tydl.Data)

file namespace: HVAC.Temperature

Measurement: Record
  fields:
    Temperature: Float32
    Humidity: Float32
Define Component Messaging Interfaces
The second step is to define the messaging interface for each software component in the application. Components have input ports for receiving messages from other components and output ports for sending messages to other components. Each port has a name and an associated data type that defines the message format. If no data type is specified, all messages sent or received on that port are treated as events with no data content. Component messaging interfaces are defined using the Smidgen syntax, which builds on Tydl.
HVAC/Heating/Element.mi
import all: from: Smidgen

file namespace: HVAC.Heating.Element

Element.IO: Messaging.Interface
  extends: Stateful.IO
  ports:
    Enable:
      input:
    Disable:
      input:
|
 |
HVAC/Temperature/Controller.mi
import all: from: (Smidgen, Smidgen.Data)

file namespace: HVAC.Temperature.Controller

Controller.IO: Messaging.Interface
  extends: Stateful.IO
  ports:
    Measurement:
      input:
      type: Measurement
    Enable:
      output:
    Disable:
      output:
  properties:
    Setpoint: Float32 default_value: 65.0
    Hysteresis: Float32 default_value: 2.0
|
 |
HVAC/Temperature/Sensor.mi
import all: from: (Smidgen, Smidgen.Data)

file namespace: HVAC.Temperature.Sensor

Sensor.IO: Messaging.Interface
  extends: Stateful.IO
  ports:
    Measurement:
      output:
      type: Measurement
  properties:
    Period: Float64 default_value: 1.0
|
 |
HVAC/Thermostat.mi
import all: from: Smidgen

file namespace: HVAC.Thermostat

Thermostat.IO: Messaging.Interface
  extends: Stateful.IO
  ports:
    Enable:
      output:
    Disable:
      output:
|
 |
Declare Primitive Components
After defining the component messaging interfaces, the next step is to
provide declarations for each primitive C++ component that will be
implemented using the Chimps framework. The Chimps
namespace is a superset of Smidgen that provides some
additional implementation-specific constructs like
Stateful.Primitive.
import all: from: Chimps

file namespace: HVAC.Heating.Element

Element.Impl: Component.Implementation
  extends: Stateful.Primitive
  interface: Element.IO
import all: from: Chimps

file namespace: HVAC.Temperature.Controller

Controller.Impl: Component.Implementation
  extends: Stateful.Primitive
  interface: Controller.IO
import all: from: Chimps

file namespace: HVAC.Temperature.Sensor

Sensor.Impl: Component.Implementation
  extends: Stateful.Primitive
  interface: Sensor.IO
  callbacks:
    Measure:
Implement Primitive Components
Primitive C++ components are implemented by supplying header and source files with class declarations and definitions that conform to the Chimps API.
#include "generated/HVAC/Heating/Element/Base.hpp"

class HVAC::Heating::Element::Impl : public Base {
 public:
  using Base::Base;

 protected:
  void handle(Enable &msg) override;
  void handle(Disable &msg) override;
}
#include "Element.hpp"

using namespace HVAC::Heating::Element;

void Impl::handle(Enable &msg) {
  log.verbose("heat enabled");
}

void Impl::handle(Disable &msg) {
  log.verbose("heat disabled");
}
#include "generated/HVAC/Temperature/Controller/Base.hpp"

class HVAC::Temperature::Controller::Impl : public Base {
 public:
  using Base::Base;

 protected:
  void handle(Initialize &msg) override;
  void handle(Finalize &msg) override;

  void handle(Measurement &msg) override;
}
#include "Controller.hpp"

using namespace HVAC::Temperature::Controller;

void Impl::handle(Initialize &msg) {
  send(Disable());
}

void Impl::handle(Finalize &msg) {
  send(Disable());
}

void Impl::handle(Measurement &msg) {
  if (msg.Temperature() > config.Setpoint() + config.Hysteresis()/2.0) {
    send(Disable());
  } else if (msg.Temperature() < config.Setpoint() - config.Hysteresis()/2.0) {
    send(Enable());
  }
}
#include "generated/HVAC/Temperature/Sensor/Base.hpp"

class HVAC::Temperature::Sensor::Impl : public Base {
 public:
  using Base::Base;

 protected:
  void handle(Reset &msg) override;
  void handle(Start &msg) override;

  void handle(Measure &msg) override;

  double read_hardware();

  unsigned int count_;
}
#include "Sensor.hpp"

using namespace HVAC::Temperature::Sensor;
using namespace chimps::chrono;

void Impl::handle(Reset &msg) {
  count_ = 0;
}

void Impl::handle(Start &msg) {
  schedule(Measure(), every(1.0_s * config.Period));
}

void Impl::handle(Measure &msg) {
  auto temperature = read_hardware();
  log.verbose("measured: {:.1f}", temperature);

  send(Measurement()
       .Temperature(temperature)
       .Humidity(0.60)
       );
}

float Impl::read_hardware() {
  const double pi = 3.14159;

  count_ += 1;

  auto t = count_ * config.Period; // s
  auto f = 0.1; // Hz
  auto temperature = 60.0 + 10.0 * sin(2*pi*f*t);

  return temperature;
}
Define Composite Components
Once the primitive components have been implemented, they can be combined and connected to form composite components that build on one another in a hierarchic fashion. Interconnections and component hierarchies are specified using Finch, an extension of Smidgen.
HVAC/Thermostat.hi
import all: from: Finch
import Temperature from: HVAC

file namespace: HVAC.Thermostat

Thermostat.Impl: Component.Implementation
  extends: Component.Hierarchy
  interface: Thermostat.IO
  subcomponents:
    Sensor: Temperature.Sensor.Impl
    Controller: Temperature.Controller.Impl
  connections:
    (source: Sensor.Measurement,
     sink: Controller.Measurement)
    (source: Controller.Enable,
     external: Enable)
    (source: Controller.Disable,
     external: Disable)
|
 |
HVAC/Heater.hi
import all: from: Finch
import Heating from: HVAC

file namespace: HVAC.Heater

Heater.Impl: Component.Implementation
  extends: Component.Hierarchy
  interface: Stateful.IO
  subcomponents:
    Thermostat: Thermostat.Impl
    Element: Heating.Element.Impl
  connections:
    (source: Thermostat.Enable,
     sink: Element.Enable)
    (source: Thermostat.Disable,
     sink: Element.Disable)
|
 |
Declare the Application
Configurable hierarchic applications can be automatically generated
from any top-level component that implements the Stateful.IO
messaging interface.
import all: from: Chimps

file namespace: HVAC.Heater

Heater.App: Application
  implementation: Heater.Impl
Arrange the Source Files
Source files are generally arranged in a directory structure that reflects the namespace hierarchy:
HVAC/
├── Heater.ha
├── Heater.hi
├── Heating
│   ├── Element.cpp
│   ├── Element.hpp
│   ├── Element.mi
│   └── Element.pi
├── Temperature
│   ├── Controller.cpp
│   ├── Controller.hpp
│   ├── Controller.mi
│   ├── Controller.pi
│   ├── Sensor.cpp
│   ├── Sensor.hpp
│   ├── Sensor.mi
│   └── Sensor.pi
├── Temperature.td
├── Thermostat.hi
└── Thermostat.mi
Build the Application
Finally, our code crafting command-line tool chain can be used to build an executable program from from the source files in accordance with the application declaration by issuing the following command in the parent directory:
chimps --build=app --all HVAC
This command automatically performs all of the intermediate steps required to build the application, which are broken out below for instructional purposes:
chimps --generate=type --entity=HVAC.Temperature.Measurement HVAC
chimps --generate=impl --entity=HVAC.Heating.Element.Impl \
                       --entity=HVAC.Temperature.Controller.Impl \
                       --entity=HVAC.Temperature.Sensor.Impl \
                       --entity=HVAC.Thermostat.Impl \
                       --entity=HVAC.Heater.Impl HVAC
chimps --generate=app  --entity=HVAC.Heater.App HVAC
chimps --compile=type  --entity=HVAC.Temperature.Measurement HVAC
chimps --compile=impl  --entity=HVAC.Heating.Element.Impl \
                       --entity=HVAC.Temperature.Controller.Impl \
                       --entity=HVAC.Temperature.Sensor.Impl \
                       --entity=HVAC.Thermostat.Impl \
                       --entity=HVAC.Heater.Impl HVAC
chimps --compile=app   --entity=HVAC.Heater.App HVAC
Please note that this tool chain has not yet been implemented, so the command-line syntax shown above may change. Although the commands are notional, they should give the reader some insight into the various steps that need to be performed.
Run the Application
The resulting program can be executed like this:
./Heater Thermostat.Controller.Setpoint=67.0
Top-Down
In a top-down workflow, the process starts with defining the high-level components and describing how data flows between them. Development proceeds by progressively breaking down each component into smaller subcomponents and defining the data flow in more detail. The final step is actually implementing the primitive components.
Define the Top-Level Components and Data Flow
The first step is to define the top-level components, the connections between them, and the direction of data flow. This application structure can be described directly using Smidgen and Finch, or by creating block diagrams using the Hildegard GUI application.
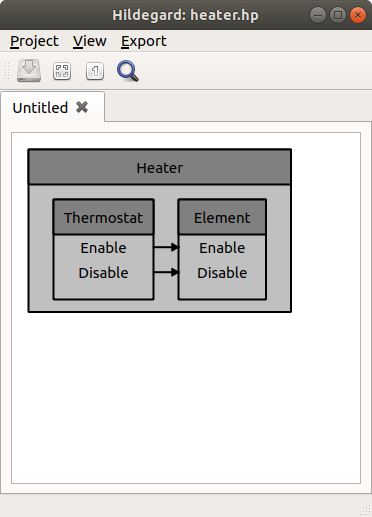
Note that since we are not dealing with concrete implementations at
this stage in the design process, subcomponents are specified in terms
of their interface (e.g. Thermostat.IO) instead of their
implementation (e.g. Thermostat.Impl).
import all: from: Finch
import Heating from: HVAC

file namespace: HVAC.Heater

Heater.Impl: Component.Implementation
  extends: Component.Hierarchy
  interface: Stateful.IO
  subcomponents:
    Thermostat: Thermostat.IO
    Element: Heating.Element.IO
  connections:
    (source: Thermostat.Enable,
     sink: Element.Enable)
    (source: Thermostat.Disable,
     sink: Element.Disable)
HVAC/Thermostat.mi and HVAC/Heating/Element.mi are defined as
shown in the bottom-up section.
Iteratively Define Subcomponents
The second step in a top-down workflow is to break each component down
into smaller subcomponents and repeat the process until the entire
system can be described in terms of primitive components. In this
example, Heating.Element is implemented as a primitive C++
component, but Thermostat is a composite component consisting of a
Sensor and a Controller.
Once again, note that subcomponents are specified in terms of their
interface (e.g. Sensor.IO) instead of their implementation
(e.g. Sensor.Impl) at this point.
import all: from: Finch
import Temperature from: HVAC

file namespace: HVAC.Thermostat

Thermostat.Impl: Component.Implementation
  extends: Component.Hierarchy
  interface: Thermostat.IO
  subcomponents:
    Sensor: Temperature.Sensor.IO
    Controller: Temperature.Controller.IO
  connections:
    (source: Sensor.Measurement,
     sink: Controller.Measurement)
    (source: Controller.Enable,
     external: Enable)
    (source: Controller.Disable,
     external: Disable)
HVAC/Temperature/Sensor.mi and HVAC/Temperature/Controller.mi
are similar to what was shown in the bottom-up section. The only differences are that the
configuration properties and the message content for the sensor
measurement have not yet been defined.
import all: from: (Smidgen, Smidgen.Data)

file namespace: HVAC.Temperature.Sensor

Sensor.IO: Messaging.Interface
  extends: Stateful.IO
  ports:
    Measurement:
      output:
import all: from: (Smidgen, Smidgen.Data)

file namespace: HVAC.Temperature.Controller

Controller.IO: Messaging.Interface
  extends: Stateful.IO
  ports:
    Measurement:
      input:
    Enable:
      output:
    Disable:
      output:
Refine Data Flow
The next step in the process is to fully define the data content and
format of each message that is passed between software components in
the application. In this example, the only message with content is
the sensor measurement, which is defined as shown in the bottom-up
section.
HVAC/Temperature/Sensor.mi and HVAC/Temperature/Controller.mi
should also be updated with a matching type attribute, as shown
before.
Define Configuration Properties
Before proceeding with the implementation, it is wise to give some consideration to what configuration properties may be required. These can be added to the component messaging interfaces, as shown previously in the bottom-up section.
Declare and Implement Primitive Components
Once the component interfaces have been fully defined, the primitive components can be declared and implemented as described in the bottom-up section.
Update Composite Component Definitions
After implementing all of the primitive components, the composite component definitions can be updated to reference concrete implementations rather than abstract messaging interfaces. This will result in the same composite component definitions listed in the bottom-up section.
Final Steps
The final steps in the top-down workflow are the same ones discussed in the bottom-up approach, namely: